For CNC owners

Cut it on your own machine.

The detail the home page leaves out: what the G‑code does, how the board is held through the flip, how to prove a file before it touches foam, and what's proven on a real machine and what isn't yet.

Proven

  • The Centroid Acorn post (.ngc), run on a real machine.
  • The geometry. Automated tests check every finishing Z stays inside the blank and above the spoilboard, every XY inside the bed, and the cut surface against the board.

Not yet

  • GRBL, Mach3 and Mach4, LinuxCNC and ShopBot. They follow their controllers' documentation but haven't cut foam, and their file headers say so.
  • The moves between passes: joined passes, arcs and ramps wait on the air-cut test.
  • Run an air cut first and watch every move, then cut a scrap blank and measure it against the checklist.

Watch it cut before the foam does.

On the CNC tab the whole job runs on screen first, on a foam blank the size of yours, so you see every file do its work before you press cycle start.
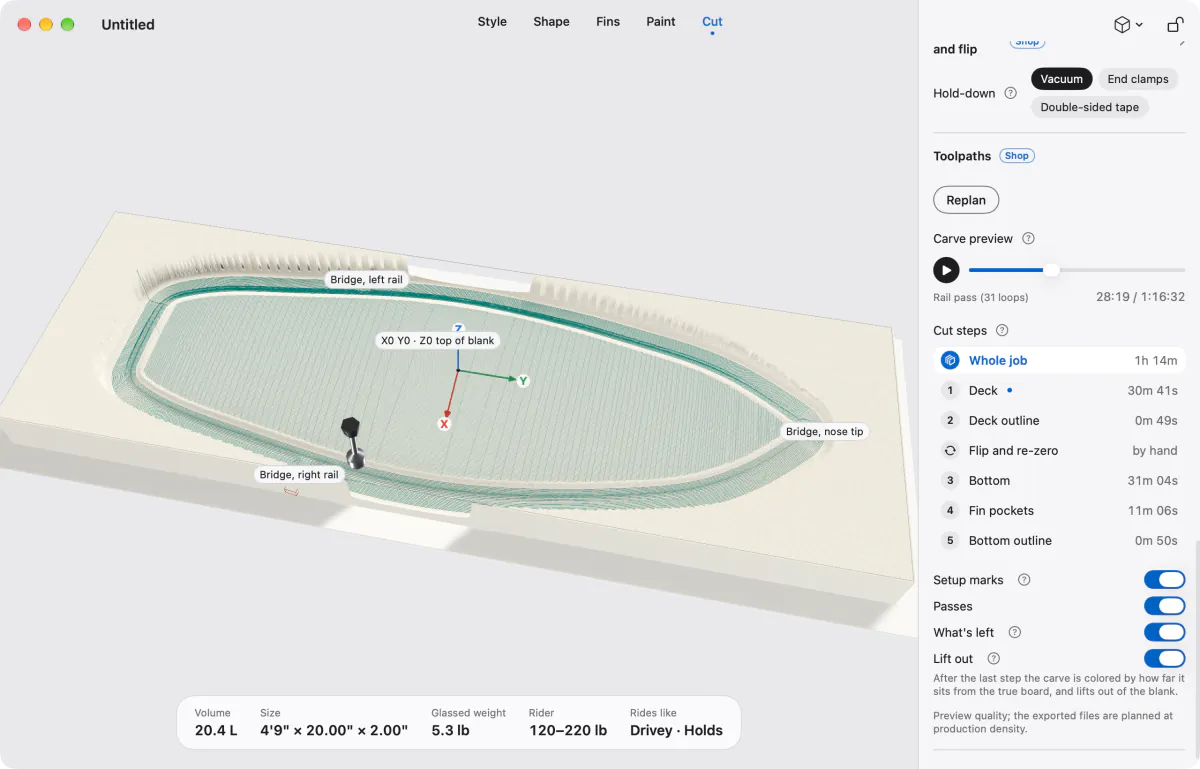
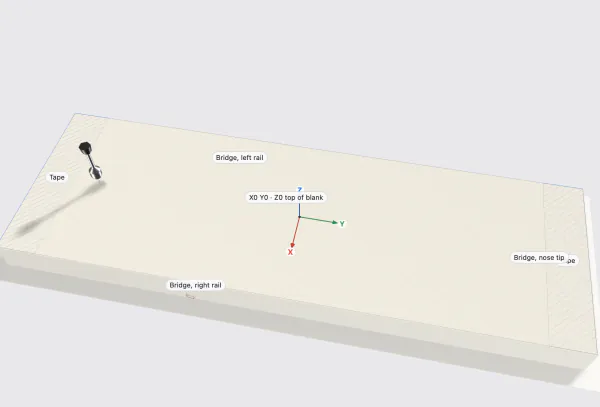
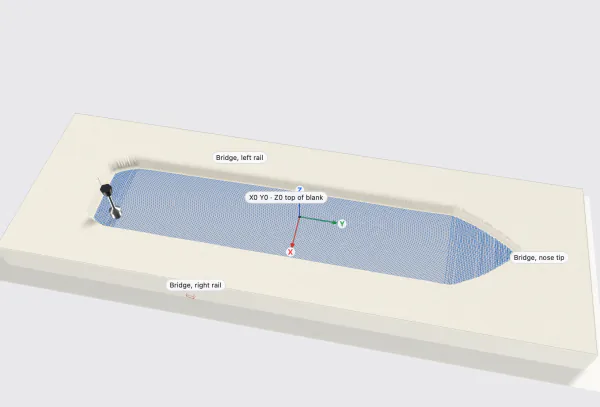
The carve preview: a foam blank on the machine table with the deck partly carved, the ball-nose bit drawn to scale, work-zero axes and bridge labels, and the list of numbered cut steps with their times
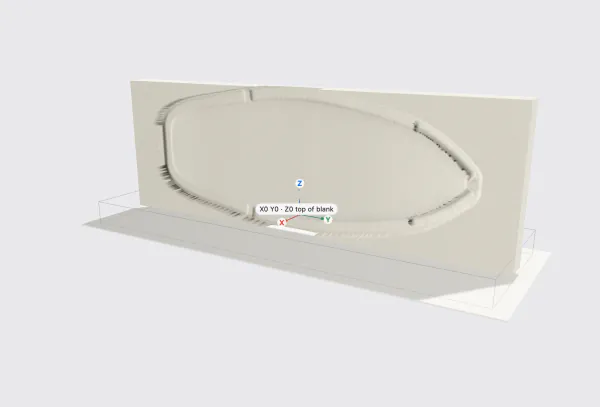
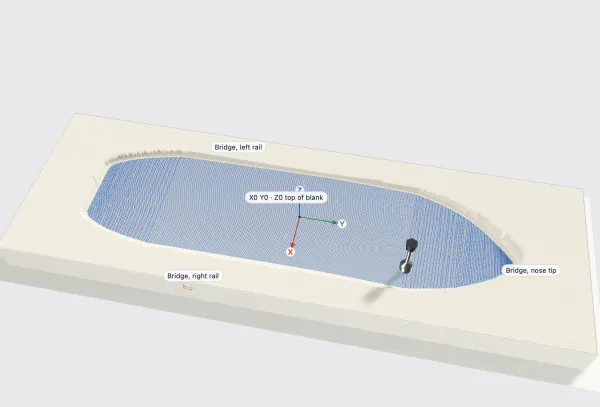
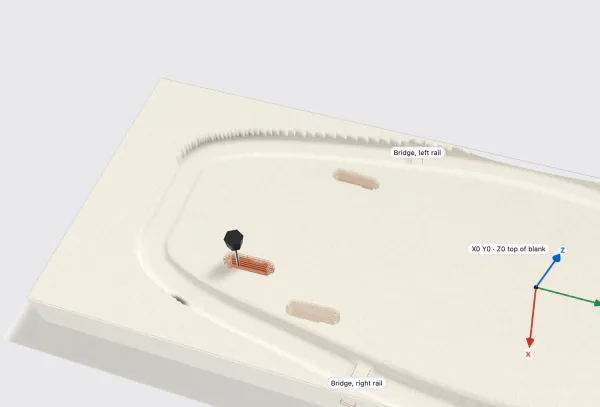
The carve preview. Scrub the slider and the bit cuts the blank away pass by pass: the deck, the flip, then the bottom, the fin pockets and the outline. Every numbered file is listed with its time.
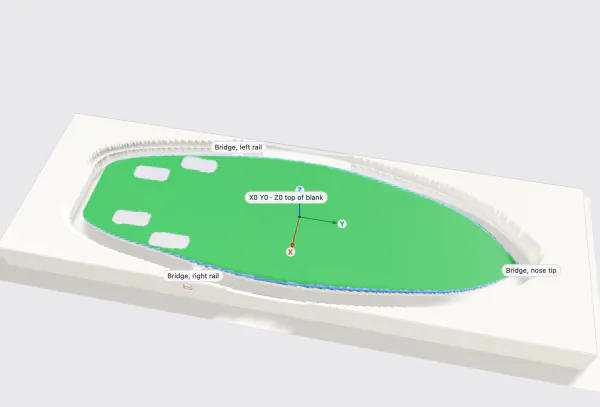
  1. The blank at the start of the job, with the work-zero axes over the board's center, tape pads hatched at both ends and labels where the bridges will stay
    Setup Work zero over the board's center, Z0 on the blank top, the tape pads and where the bridges will stay. The bit is drawn to scale.
  2. The deck being cut: finished passes faded, the current pass bright up to the bit
    1 · Deck Pick one file and the slider covers only that file. Done passes fade, the current one is bright, the rest wait.
  3. The blank seen from the side, half way through turning over about its length, the carved deck rotating toward the table
    Flip The blank turns over about its length. The carved deck goes face down; you re-zero on the new top face.
  4. The bottom being cut after the flip, seen from above
    3 · Bottom The second side, cut from above like the first, with the bridge positions mirrored.
  5. Close on the tail: a quarter-inch end mill to scale in a fin box pocket at the tail, the pockets before it already cut
    4 · Fin pockets Framed on the tail, with the ¼" end mill to scale in the box it's cutting.
  6. The finished board in the blank colored green almost everywhere, a thin blue band on the rails, the fin pockets gray, and a legend with the share in each band
    What's left Green is on shape, blue is foam to sand, red is over-cut. On this board: 96.7% within half a millimeter, the rest on the rail band, nothing over-cut.

Lift it out. Turn it over.

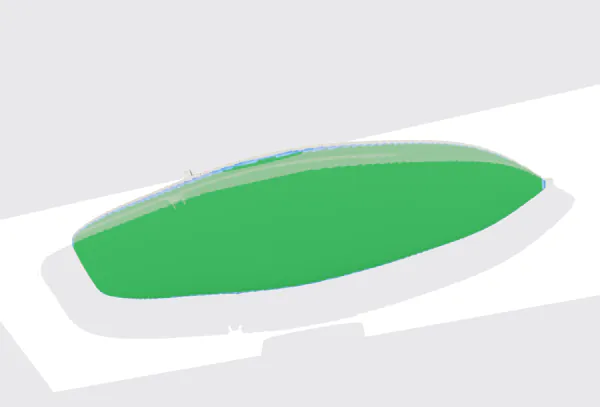
At the end of the job the board rises off the table on its bridge stubs and the waste frame fades, so you can orbit it and judge both faces. Deck looks from underneath, Bottom from above, and both carry the "what's left" colors.
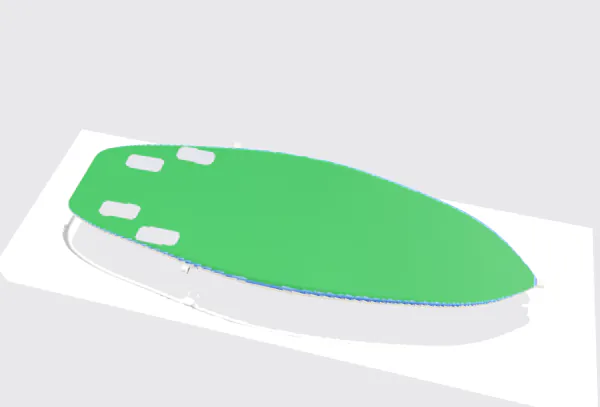
The carved board lifted off the table, bottom up, colored green with gray fin pockets and three short bridge stubs
Bottom, with the fin pockets gray.
The lifted board seen from underneath: the carved deck colored green
Deck, seen from underneath.

00:00

The whole job for the sample sample, —, at the Fine finish, cut from an —: deck, deck outline, flip and re-zero, bottom, fin pockets, bottom outline. — at — rpm. Estimated by the app and written into every file's header, along with the time at the other two finishes.

Quick cut: a few choices, then export.

Cut › CNC opens on the machine, the post to write G‑code for, the blank, the finish and the Export button. Bits, deep cuts, tilt, machine settings, hold-down and the toolpath and carve preview wait under Advanced.
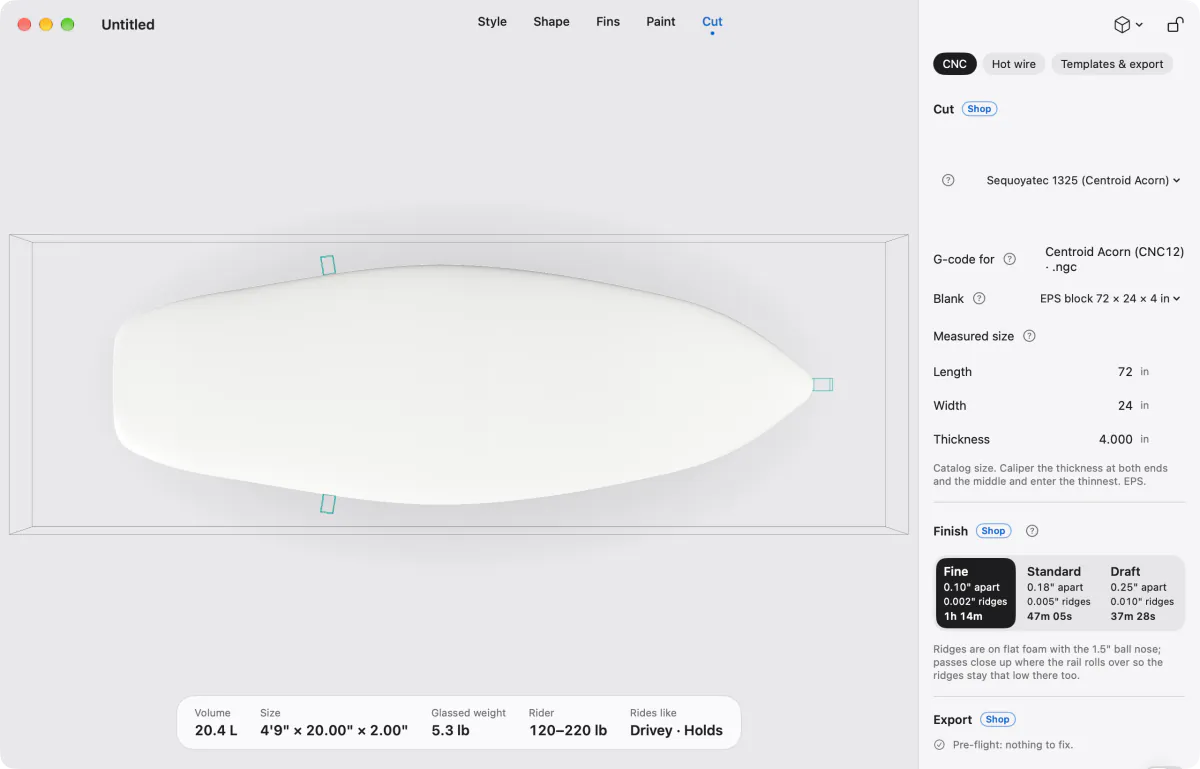
Quick cut on the Cut step: the board from above on the machine table, and an inspector with the machine, G-code for, the blank with its measured length, width and thickness, the finish presets with their whole-job times, and Export
Quick cut, beside the board on the machine table.
  • The blank as you measured it. Length, width and thickness start from the catalog size. Caliper the thickness at both ends and in the middle and enter the thinnest; Z0, the flip and where the two outline cuts meet are planned on the size you entered.
  • Checks above the button. Pre-flight checks sit right above Export. An error blocks the export until it's fixed.
  • Air cut, then a test cut. Every export writes Test-cut checklist.txt next to the numbered files: the expected thickness 12" from the tail, in the middle and 12" from the nose, the rail apex height, the width at the wide point, the overall length, the fin pocket depth and where the outline cuts meet, each with a blank for what you measure. Run an air cut, then cut a scrap blank of the same size and measure it.
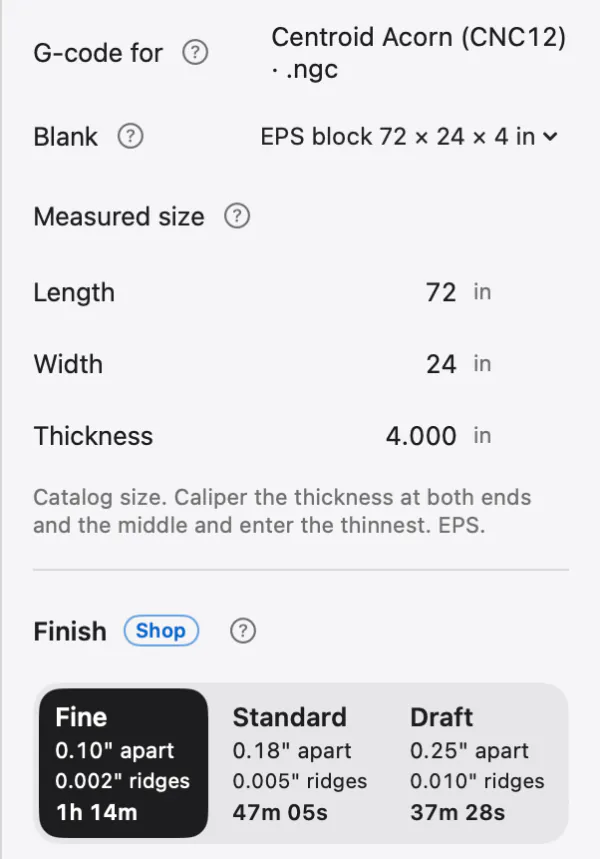
The G-code for, Blank and Measured size controls: an EPS block 72 by 24 by 4 inches, with length, width and thickness fields and the note to caliper the thickness at both ends and the middle and enter the thinnest, above the finish presets

Measured size.

Pick the blank from the catalog, then type what your calipers say. The plan follows the foam you actually have.
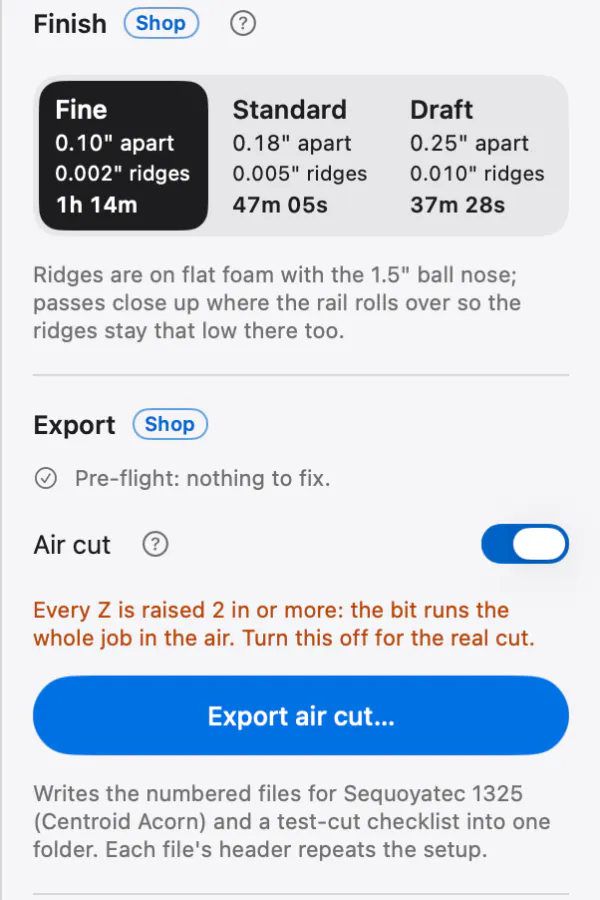
Air cut switched on: an orange line saying every Z is raised 2 inches or more so the bit runs the whole job in the air, the Export air cut button, and a note that the numbered files and a test-cut checklist go into one folder

Air cut.

Every Z is raised 2" or more, so the bit runs the whole job above the blank. The warning is orange and the button reads "Export air cut…".
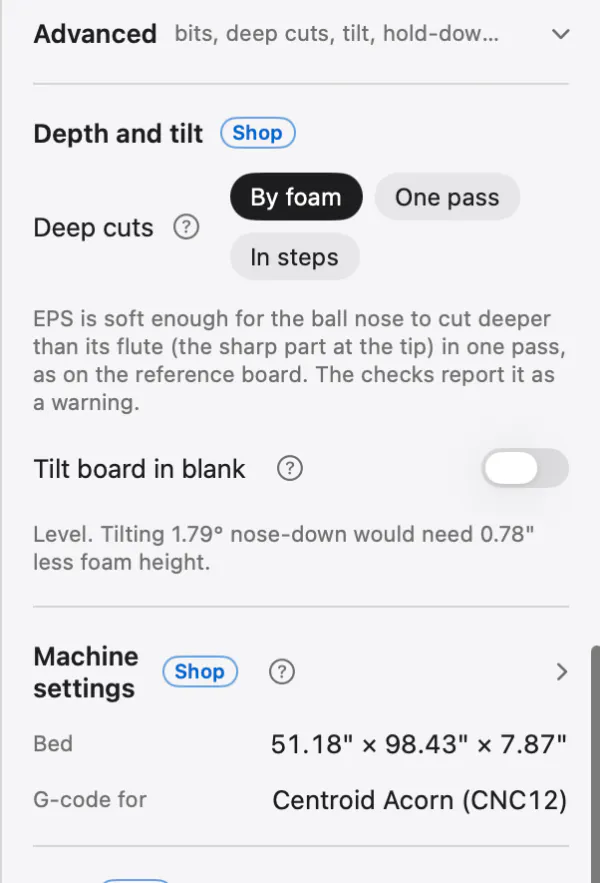
The Advanced disclosure open: Depth and tilt with the deep-cut rule and the tilt switch, Machine settings with the bed size and post, and the start of the Bits list

Advanced.

Deep cuts and tilt, machine settings, bits and hold-down, for when the defaults aren't your shop.

Set the job up the way your shop works.

The finish is part of Quick cut; bits and hold-down are under Advanced. Every choice shows what it does to the cut before you make it.
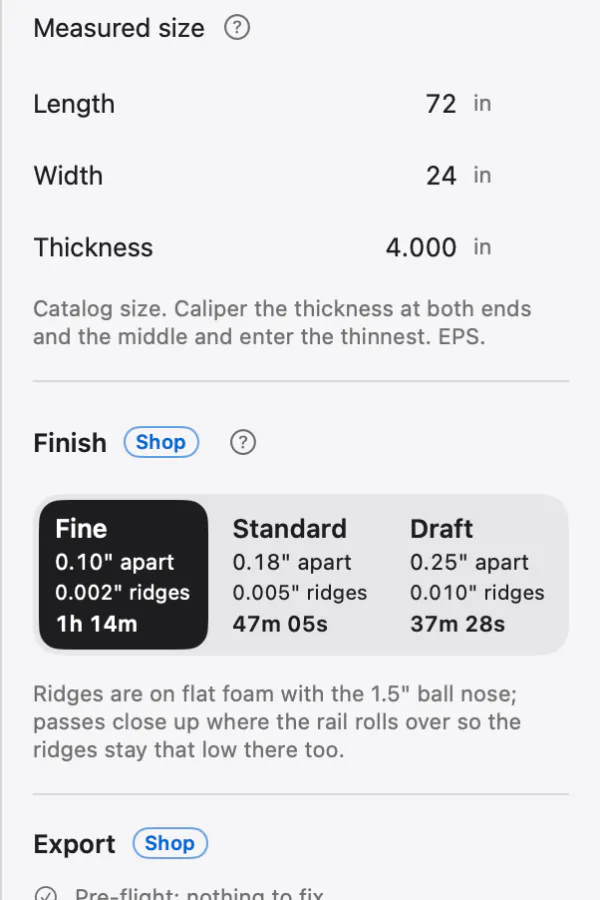
The Finish control: Fine, 0.10 inch apart, 0.002 inch ridges; Standard, 0.18 inch, 0.005 inch ridges; Draft, 0.25 inch, 0.010 inch ridges; each with its whole-job time

Finish presets.

Fine (0.10" between passes, the default), Standard (0.18") or Draft (0.25"), each showing the ridge height it leaves and the whole-job time.
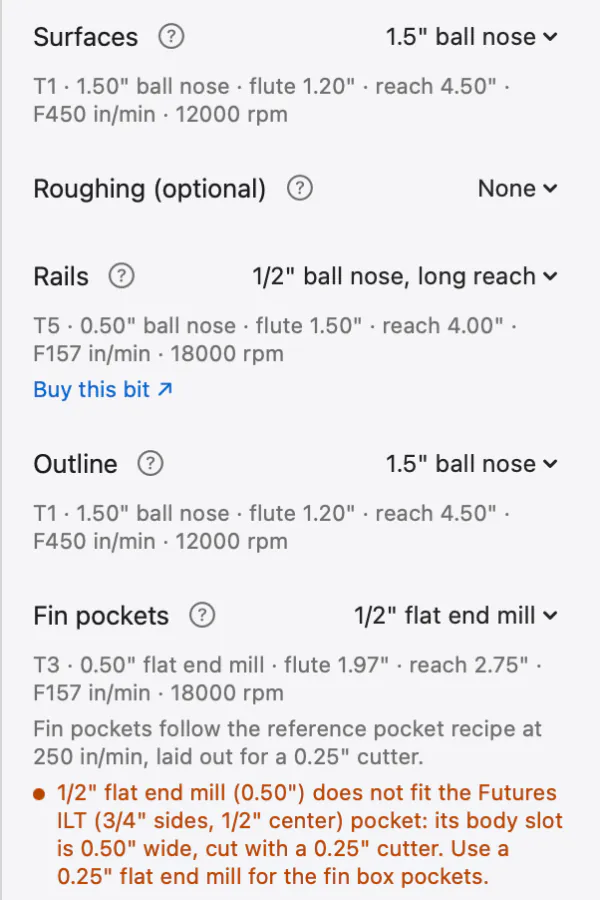
The Bits list: roughing, rails, outline and fin pockets, each with its own bit, a Buy this bit link under the rail bit and a warning under a pocket bit that is too wide for the Futures pocket

A bit for every job.

Surfaces, roughing, rails, outline and fin pockets each get their own bit, and so do the pin holes if you turn registration pins on. If one won't fit its job, too wide for the pocket or too short for the wall, it says so right under it.
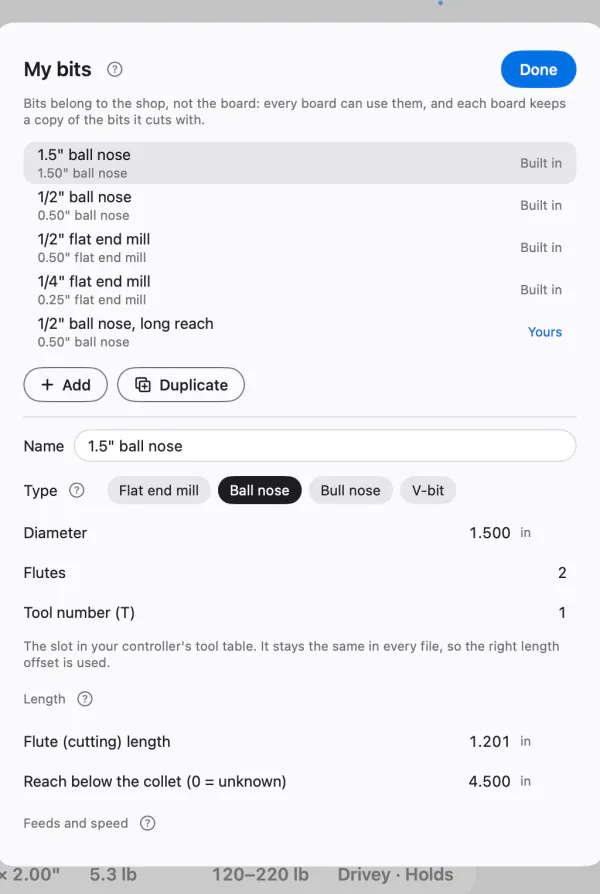
The My bits editor: built-in bits and your own, with type, diameter, flutes, flute length, reach, feed and plunge

Your own bits.

Add the bits you actually own, with flute length, reach, feeds and a link to where you buy them. They belong to the shop, so every board can use them.
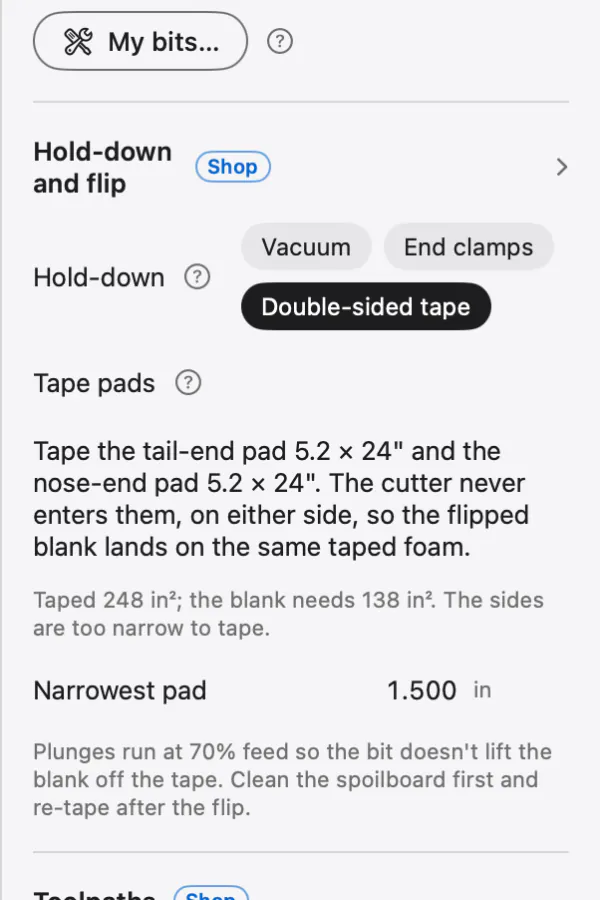
Hold-down set to double-sided tape, with the tape pads described in words: tape the tail-end pad 5.2 by 24 inches and the nose-end pad 5.2 by 24 inches

Tape, vacuum or clamps.

With double-sided tape, the app lists the end pads to tape, keeps every pass out of them on both sides, and checks the taped area against what the blank needs.
  • Outline from both sides. Each outline wall is cut half depth from its own face, in laps of up to 1", and the two meet in the middle of the blank. No bit has to reach all the way through.
  • Three bridges hold the board. One at the nose tip and one on each rail ahead of the fins keep the board in the blank through the last pass. The tail is always cut clean. Cut the bridges by hand when the job is done.
  • No holes in your spoilboard. Registration pins are optional and off by default. Every file's header says how to re-zero after the flip: X0 on the blank's centerline, Y0 from its ends, Z0 on the new top face.
  • Blank selector. EPS, PU and XPS stock sizes. The smallest blank that fits is picked for you; if the board doesn't fit, it says which dimension and suggests one that does.
  • Machine profiles. Bed size, units and post-processor: Centroid Acorn, GRBL, Mach3 and Mach4, LinuxCNC, ShopBot .sbp. The Centroid Acorn post is the one proven on a real machine. The others follow their controllers' documentation but have not cut foam yet; their file headers and Quick cut say so. Run an air cut first and watch every move. A board that overruns the bed is flagged before you export.
  • Passes joined at feed. Between passes the bit moves at feed just above the finished surface, through foam that's already cut, instead of lifting to a safe height and coming back down. On the board in the comparison below, that took the estimate from 1 h 20 min to 1 h 10 min.
  • Files your controller will take. GRBL and ShopBot get one file per bit. Comments are plain ASCII and file names are safe for a USB stick. Each bit's reach and the end-clamp keep-out are checked, and a board error blocks the export.
  • Fin pockets in the job. Routed right after the bottom, with floors that follow the rocker.
  • Rail pass. Outline-parallel loops finish the rail, spaced for its slope, so the roll comes out as smooth as the flats.
  • Saved with the board. Cut settings live inside the .shapewake file, so the next revision cuts the same way.
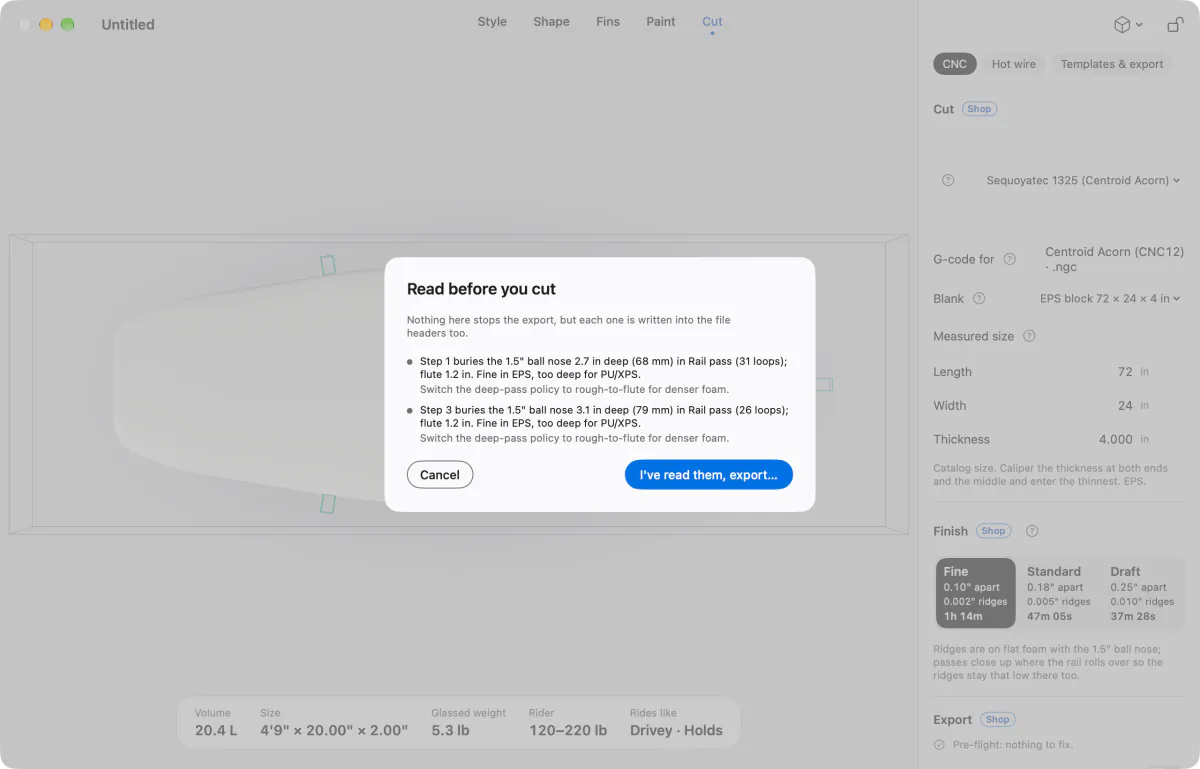
A Read before you cut sheet listing warnings, each with a suggested fix
Before anything is written, the whole job is run against the blank in software. Warnings name the problem and the fix, and go into the file headers too.
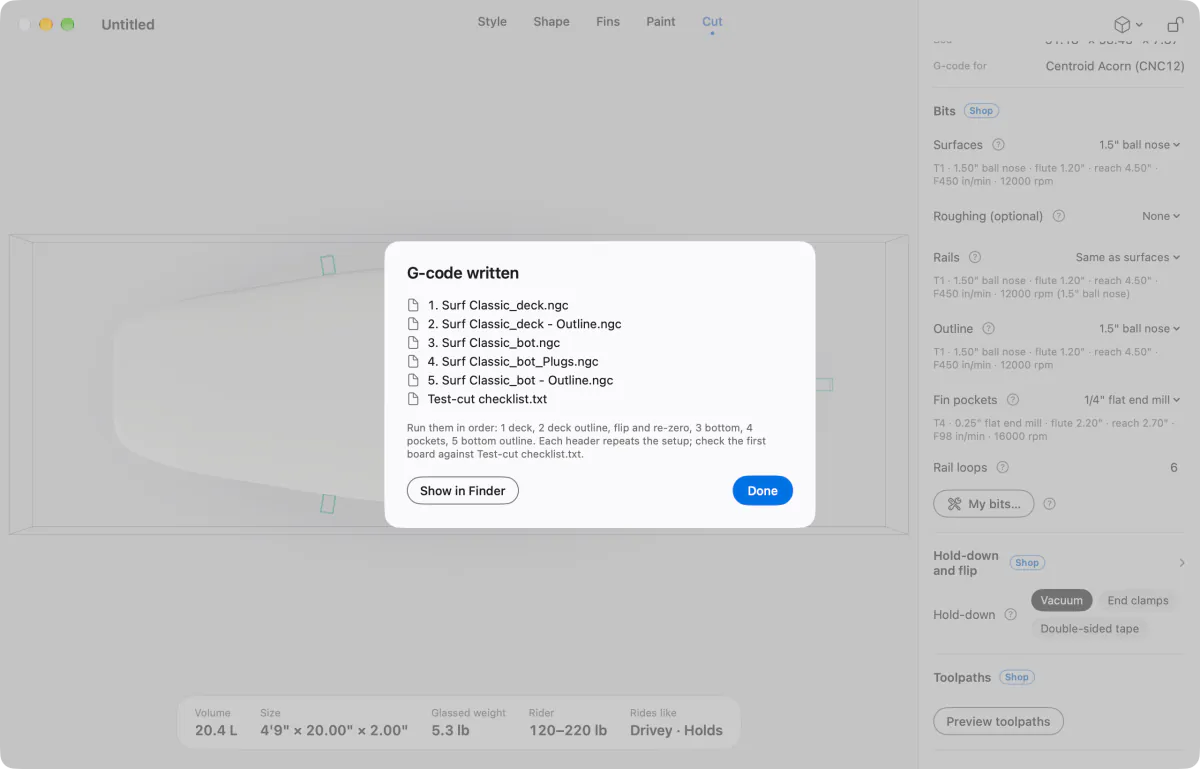
A G-code written sheet listing the numbered files from 1 deck to 5 bottom outline, in the order to run them, and Test-cut checklist.txt
The numbered files in the order you run them, and the test-cut checklist, in one folder. Turn pins on and file 0 drills them first.
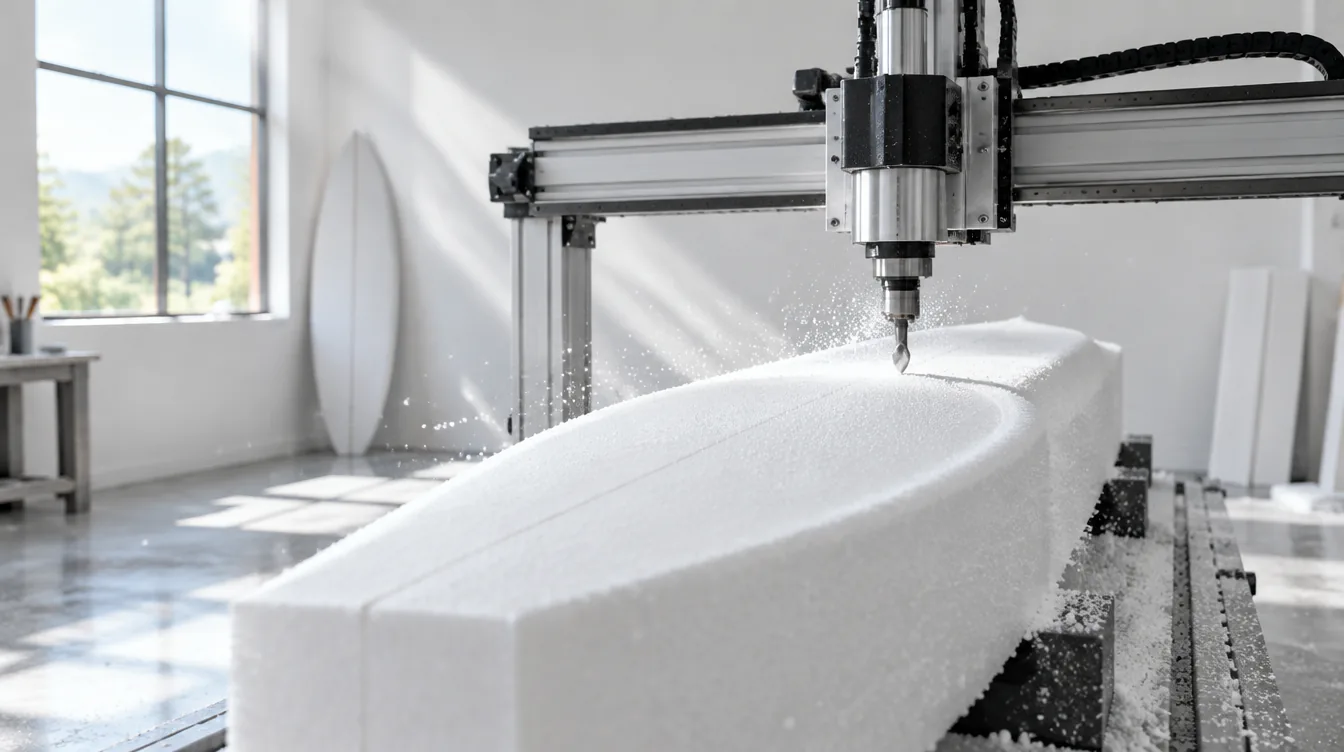
A CNC router carving a white foam board blank in a bright workshop

For shapers who cut their own.

The G‑code is real, checked, and written for a person standing at the machine. Every file opens with a header you can read before you press cycle start.

Shorter jobs, measured on a real board.

We put ShapeWake's files next to a production cut of the same board from a commercial shaping program: same blank, same machine, each file at its own feeds, both run through the same stock simulator. ShapeWake was set to its Fine finish, 0.10" between passes, which leaves smaller ridges on the flats than the other files do.

ShapeWake
1 h 10 min
Commercial program
1 h 52 min

Run both at the same feeds and it's 59 min 42 s against 1 h 42 min. Less of the job is spent cutting air, too: 12% and 11% of the feed moves on the deck and bottom, against 16% and 16%. ShapeWake joins its passes at feed, just above the finished surface through foam that's already cut, instead of lifting the bit between them; that took about ten minutes off this job.

Five posts.

Centroid Acorn (.ngc), GRBL (.nc), Mach3 and Mach4 (.tap), LinuxCNC (.ngc), ShopBot (.sbp). Inches or millimeters, whichever your machine speaks. The Acorn post is proven on a real machine; the other four follow their documentation but haven't cut foam yet, and their headers say so. Run an air cut first.

The header tells you work zero, the flip and the re-zero.

Where X0 Y0 is, which face is Z0 for this side, which axis to roll the blank about, how to re-zero after the flip, and where the three bridges are and when to cut them.

Stock simulation keeps the bit out of trouble.

Before the files are written, every pass is run against a model of the blank. Each file lists the blank top and the spoilboard, the board's highest and lowest points, and the foam left above and below them. Tests check every Z stays inside the blank and every XY inside the bed.

A deep-pass rule per foam.

EPS lets a ball nose run past its flute in one pass; PU and XPS don't. The policy is chosen from the blank material and spelled out in the header, with the depth it will reach.

(header excerpt loads from js/board-data.js, generated from the sample G-code)
The top of the real bottom-side file from the sample board, as exported for the default post.

Fin pockets in the same job.

Routed right after the bottom, with floors that follow the rocker and pockets that turn with the toe.
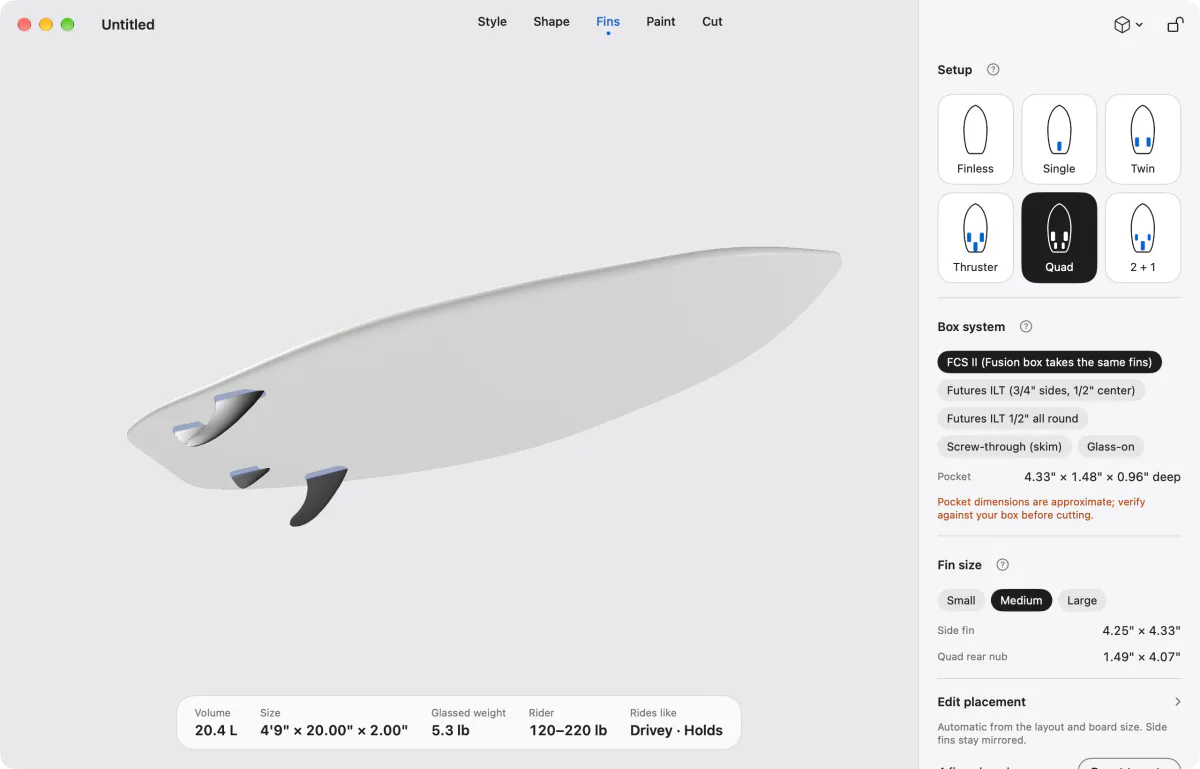
  • Toe and cant from Futures' guidance. ¼" toe toward the nose on side and front fins, ⅛" on quad rears. Cant 6.5° on thruster sides and quad fronts, 4° on twins and 2+1 sides, 3° on quad rears, 0° on center fins and skim fins.
  • Five box systems. FCS II (Fusion boxes take the same fins), Futures ILT with ¾" sides and a ½" center, Futures ILT ½" all round, screw-through for skims, and glass-on.
  • Pockets from a proven recipe. The Futures ILT ½" pocket is cut the way a production board was: a shallow recess for the flange, a deeper slot for the body, both floors following the rocker. Pockets turn with the toe.
The board as a quad: two swept front fins and two low, long rear nubs
Quad. Fronts at 6.5°, low swept nubs behind them at 3°.

Futures and FCS don't publish pocket depths for the Futures ¾" box or FCS II, so the app and the G‑code header mark those approximate. Verify against your box, or cut a test pocket in scrap foam.

Hot wire, or files for a shop.

No router? Cut the blank with a four-axis hot wire, or send the files to a shop that cuts customer files.
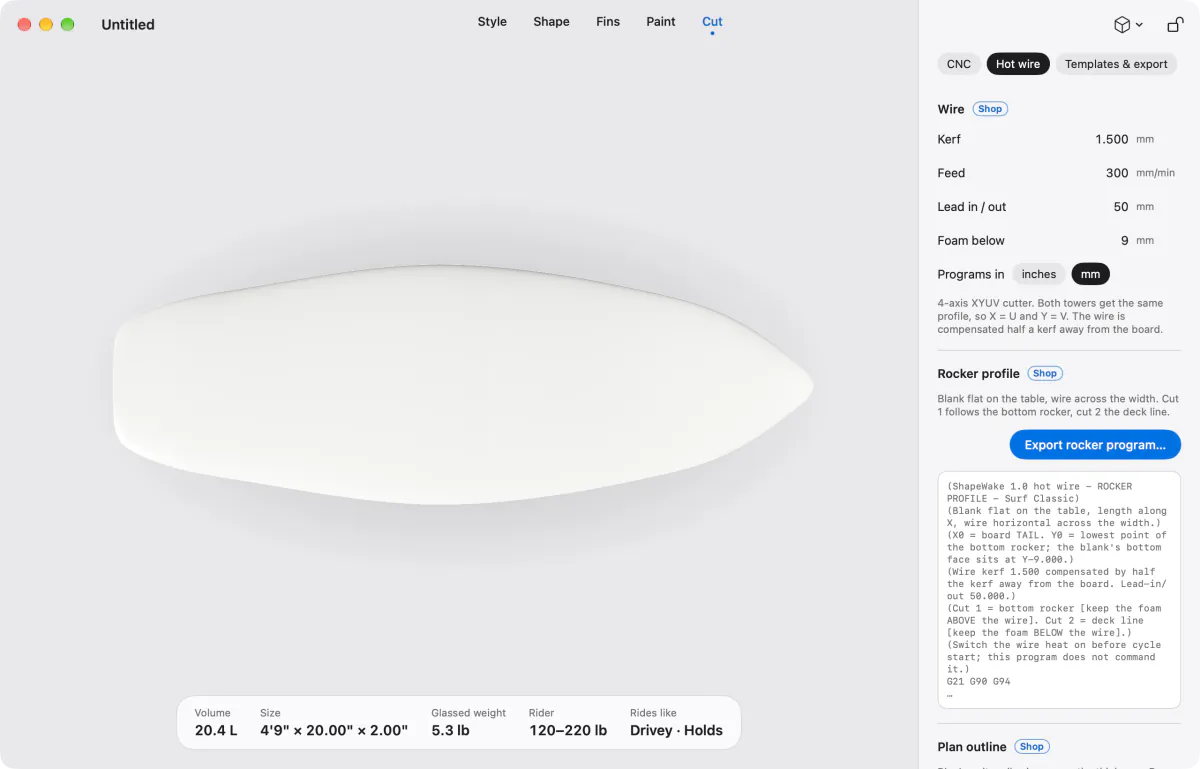
  • Four-axis foam cutter. Two programs: the outline from the top and the rocker profile from the side.
  • Kerf compensated. The wire path is offset by half the kerf away from the board, with lead-in and lead-out so the wire is at temperature before it meets foam.
  • Which side to keep is in the file. Each cut says in plain words whether the board is above or below the wire.
The Hot wire tab: kerf, feed, lead in and out, foam below, inches or mm, and a preview of the rocker program header
Rocker first, then outline. Keep the foam the comment tells you to.
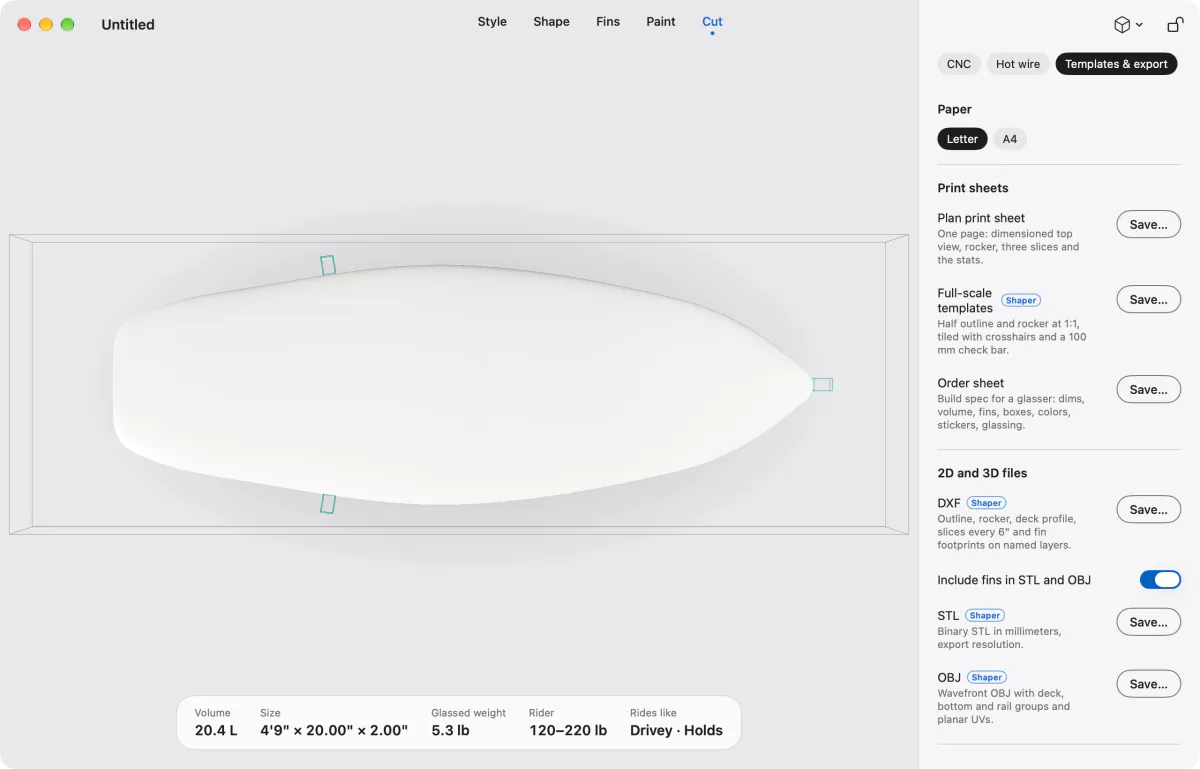
  • Plan print sheet. One page with every dimension. Free.
  • Order sheet. A one-page build spec for a glasser or factory: dimensions, volume, fins, boxes, colors and the sticker list. Free.
  • Full-scale templates. Outline and rocker, tiled across Letter or A4 pages with registration marks, for shaping by hand. Shaper.
  • 2D and 3D exports. PDF and DXF of the outline, rocker and slices; STL and OBJ of the whole board. Shaper.
The Templates and export tab: Letter or A4, plan print sheet, full-scale templates, order sheet, and DXF, STL and OBJ exports
Plan sheet and order sheet in every tier; full-scale templates and the 2D and 3D files with Shaper.

Questions from the shop floor

Which machines does it talk to?

Anything that reads one of five posts: Centroid Acorn, GRBL, Mach3/Mach4, LinuxCNC and ShopBot .sbp. The Centroid Acorn post is proven on a real machine. The other four follow their controllers' documentation but have not cut foam yet, and their file headers say so: run an air cut first and watch every move. You set the bed size and units in a machine profile; the board is checked against the bed before export. Hot-wire output is for a four-axis foam cutter.

Are the fin box pockets exact?

For the Futures ILT ½" box, yes: the pocket is a proven two-tier recipe (a shallow recess for the flange, a deeper slot for the body) taken from a production cut file, with both floors following the rocker and the pocket turned with the fin's toe. For Futures ¾" and FCS II, the footprints come from published sources but the manufacturers don't publish pocket depths, so the app and the G-code header mark those "approximate, verify against your box". A box defined in an imported .s3dx file is cut as defined. Either way, a test pocket in scrap foam is cheap insurance.

Do I have to drill holes in my spoilboard?

No. Registration pins are optional and off by default. Without them, you flip the blank about its length, set it back where it was, and re-zero: X0 on the blank's centerline, Y0 from its ends, Z0 on the new top face. Every file's header spells that out with the numbers for your blank. If you'd rather use pins, turn them on: the job adds a short first file that drills two centerline holes for dowels, and the flipped blank drops back onto them.

How is the board held when the outline cuts through?

By three foam bridges: one at the nose tip and one on each rail, ahead of the fins. They're 1" wide and left uncut by both outline passes, so the board stays in the blank until the last file is done. The tail is always cut clean. Afterwards, cut the bridges with a pull saw or a knife along the rail line and sand the stubs flush. The carve preview shows exactly where they are.

Can I use my own bits?

Yes. Pick a bit for each job (surfaces, roughing, rails, outline, fin pockets, pin holes) from the library or add your own with its size, flute length, feeds and a link to where you buy it. The app checks each bit fits its job, and the G-code includes the tool changes your controller expects.

What's the file format?

.shapewake, a JSON document, the same on Mac and iPad. Save, open, recents and duplicate come from the system. Your cut settings are saved inside it, so a board cuts the same way next season.

Is the G‑code safe to run?

Every file starts with a geometry check: blank top, spoilboard, board high and low points, and the foam left around them. Before export the whole job runs against a model of the blank, and the carve preview lets you watch it. Air cut writes the same job with every Z raised 2" or more, so you can watch the machine run it above the blank first. Automated tests confirm every finishing Z stays inside the blank and above the spoilboard, every XY stays inside the bed, and the cut surface matches the board within tolerance. Read the header anyway, verify the safe height under your Z convention, and check your bit's rated rpm. It's foam, but it's still a spinning tool.

Join the waitlist Back to ShapeWake